How to Install Android TV on the Fire TV 2.
Page 1 of 3Posted March 13, 2017
Updated March 14, 2017
The first thing I should say is while there is basic functionality here, not everything works just yet. As more people read about this in this tutorial, and attempt to follow it, it may expose new issues that haven't come to light yet. Please keep that in mind. You are participating in a beta program in a way, and not just clicking a button or two and enjoying a finished product. If you have questions you should post them in the thread listed in the next paragraph. This way people can work together and share their experiences in how they solved any issues that may come up. Most likely this tutorial will evolve as more participate in this process.
I came across the procedure for doing this on the XDA Developer's Forums. A member by the screen name of "Peleg" figured this out. I read the thread with interest and saw that a few people were looking for someone to document the process with a little more detail. Hopefully this tutorial can help. Keep in mind while I have both Mac and Windows computers, I prefer Mac so the screen shots will be from that perspective. What OS you're running on your computer really doesn't matter, as the tools used are available for Linux, Mac, and Windows.
This tutorial will document my experience updating my previously rooted Fire TV 2 running 5.0.5 firmware. If your Fire TV isn't already rooted, then you will not be able to install Android TV. You may also be able to use this tutorial on other versions of the Fire TV, but I can't verify that as I only own the Fire TV 2.
Keep in mind you perform everything here at YOUR OWN RISK. If you get into a jam, then you should consider posting in that thread on XDA forums. I do not provide technical support. I'm merely a technical writer.
I may not have gone about everything in the most ideal method, but for me it works. I am certainly open to any feedback to improve what I've posted. You may want to read that thread above, in its entirety. Make sure this is something you want to do BEFORE proceeding. It isn't difficult to switch back from Android TV to Fire TV; just issue a couple commands in the Terminal. You won't be stuck in Android TV land if you don't like it.
You may also want to read one of my rooting tutorials if you aren't already rooted. Depending on the firmware on your Fire TV right now, you may be able to root it. My tutorials are limited to 5.0.5 firmware. If you are on other firmware (or devices) you may want to consult AFTV News. They have an excellent selection of tutorials to help get you started. Both that site and the XDA forums are where I learned how to do everything with the Fire TV. They are both great resources. Use them!
This tutorial is broken down into numerous sections as there is a lot to do. You can jump to any section by clicking on it.
- Section 1 - Update to a pre-rooted ROM (as needed). Block software updates (Method 1).
- Section 2 - Enable the ADB connection and set up communication to the Fire TV. Block software updates (Method 2).
- Section 3 - Install the Android TV Launcher.
- Section 4 - Install the Xposed Framework.
- Section 5 - Install the HDXPosed module.
- Section 6 - Install the XInstaller module.
- Section 7 - Upload and configure the TvSettings.apk.
- Section 8 - Disable Amazon packages so that the Android TV launcher will be the default launcher.
Section 1 - Update to a pre-rooted ROM (as needed). Block software updates (Method 1).
Since various Fire TVs have unique firmware families, I'm providing the links to the pre-rooted ROMs for all of them. At the time of this tutorial being posted, the most recent firmware for the Fire TV 2 is 5.2.4.0. If that changes, you will want to seek out a newer pre-rooted ROM, and specifically for your device. While I will provide additional information for other Fire TV devices, my instructions (and screen shots) will be showing the process for the Fire TV 2.Step 1
When downloading a pre-rooted ROM (or any file for that matter), check for an md5 sum (if one is provided). This is a number that helps you verify that the file you are downloading is the original file.Download pre-rooted ROMs for the Fire TV 2 from this thread on XDA Forums.
Warning: Do NOT flash 5.0.5.1 or earlier firmware, if you already have 5.2.1.0 or newer firmware installed. You WILL destroy your Fire TV 2, and make it unusable.
Download pre-rooted ROMs for the Fire TV 1 from this thread on XDA Forums.
Download pre-rooted ROMs for the Fire TV Stick from this thread on XDA Forums.
You will now have a firmware file in zip format. Do not unzip the file.

Step 2
Here is how you check the md5sum of the file you just downloaded.Open the Finder and go to your Applications folder, then go into the Utilities folder. Launch the Terminal application.

Enter
Then put a space after it. Then drag the file into the Terminal window. The Terminal will enter the path to the file for you. Press the Enter key and it will provide the check code for the file. Now just compare the sums.md5

That's how I do this. Keep in mind the file could get corrupted after uploading it to your Fire TV, or USB drive. That's a chance I'm willing to take.
If you would like to check the sum of the file once it's on the Fire TV (or on your storage device) then read this tutorial over at AFTV News.com. It will show you how to use TWRP to perform the verification check just prior to flashing the file. It will require a few more steps to do this, but it may be worth it to you.
Step 3
Copy the pre-rooted ROM to your USB drive or MicroSD card. Make sure your storage device is formatted as FAT 32. For the scheme (or parition map) use Master Boot Record. This is especially important for those using a Mac as it will default to GUID and cause issues.
Make sure this file is placed in the top most directory (not in a folder). Here is what your USB drive should look like.

Step 4
I'm using a powered USB hub that I plug my USB hard drive and keyboard/trackpad into. I then plug the hub into the Fire TV.Here's the first screen you will see (after the Amazon logo). If you don't see this screen, then let the Fire TV boot up normally, then go to Settings, System, Restart and try it again. Note that if you aren't already rooted then you will never see this screen.

The next screen is the boot menu selector. Highlight the button on the right to Launch Recovery. You can't press enter. You will only have a couple seconds to do this. If you don't choose in time, you will boot into the Fire TV OS instead. If you miss this just go to Settings, System, Restart and try it again.

You will see one of two screens next.
If your Fire TV is brand new (but on rootable firmware), fresh out of the box, never been powered up or registered with Amazon yet (or you otherwise know how to return it to factory new condition), then you will see this screen next.
Click Swipe to Allow Modifications.

If your Fire TV was previously rooted (and still rooted) then you will come to this screen instead.
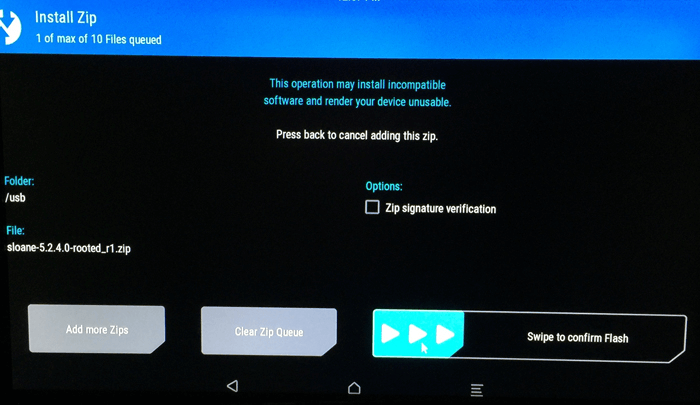
Once you are at this menu screen click the Install button.
The next screen displayed the contents of my USB drive. You may need to click the Select Storage button to locate your storage device.
If you copied your files to your storage directly by connecting it to your Mac you will see that the Mac OS just loves adding extra hidden files in directores. You may see your ROM appearing twice. Select the ROM that does NOT start with ._ in front of the file name.

Click the button with the three arrows on it right next to where it says Swipe to confirm Flash in the bottom right corner. The process will start immediately.
Wait for the pre-rooted ROM to install. This will only take a couple minutes.

Once the install has completed click the symbol that looks like a house at the bottom of the screen. It's the middle button.

Step 5
The next most important thing to do is to block any software updates from Amazon. I will cover two different methods in this tutorial. I think they should both be performed just in case. You want to make sure you don't lose root. In this step we will only perform one of the methods of blocking updates.I highly recommend visiting AFTV News.com and reading their tutorial: How to block updates on a rooted Fire TV or Fire TV Stick by setting a custom Fire OS version number. This tutorial is fantastic because it gives you so many options for carrying this out: Using TWRP, ES File Explorer, and then transferring files over ADB or via removable storage.
I used TWRP and a USB drive to transfer the build.prop file back and forth. I used the stock TextEdit application on the Mac. You want to use a plain text program to modify this file. A word processor might embed additional bloat in the file and corrupt it.
Without screen shots, here's what I did:
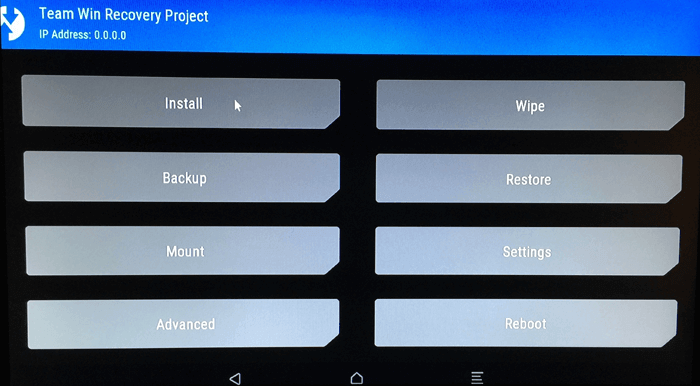
- From the TWRP main menu (the 8 gray buttons), click on Mount.
- From the "Select Partitions to Mount" list, click on System.
- At the bottom of the screen click the middle symbol (the house).
- If your USB drive isn't already connected, connect it.
- From the TWRP main menu (the 8 gray buttons), click on Mount.
- From the "Select Partitions to Mount" list, click on USB (or Micro SDCard if that's what you are using).
- At the bottom of the screen click the middle symbol (the house).
- From the TWRP main menu (the 8 gray buttons), click on Advanced.
- Click File Manager.
- You should be at root (/). Scroll down the list and click on system. Click and drag the blue bar to scroll.
- Scroll down the list and click on build.prop.
- Click Copy File.
- Scroll down the list and click on usb.
- Click Select Current Folder.
- Click on the 3 arrows button next to Swipe to Confirm.
- At the bottom of the screen click the middle symbol (the house).
- From the TWRP main menu (the 8 gray buttons), click on Mount.
- Uncheck the box for USB and then remove your USB drive.
- Plug your USB drive into your Mac.
- Open the build.prop file with TextEdit.
- Find the line (it's toward the top) that starts with "ro.build.version.number=".
- Replace the string of numbers with 987654321 and save the file.
- Remove the USB drive from your Mac and connect it back to your Fire TV.
- From the TWRP main menu (the 8 gray buttons), click on Mount.
- From the "Select Partitions to Mount" list, click on USB (or Micro SDCard if that's what you are using).
- At the bottom of the screen click the middle symbol (the house).
- From the TWRP main menu (the 8 gray buttons), click on Advanced.
- Click File Manager.
- Navigate to the USB drive. You are probably still at /system. So scroll up and click on "Up A Level".
- Scroll down the list and click on usb.
- Select build.prop.
- Click Copy File.
- You are probably at /usb so click "Up A Level." You should now be at root (/).
- Scroll down the list and click on system.
- Click Select Current Folder.
- Click on the 3 arrows button next to Swipe to Confirm.
- At the bottom of the screen click the middle symbol (the house).
- From the TWRP main menu (the 8 gray buttons), click on Advanced.
- Click Terminal
- Type the following
and then click the blue arrow key on the screen to enter the command.cat /system/build.prop | grep number
- You should see 987654321. This confirms your file was modifed correctly.
- Press the Escape key on your keyboard to exit the Terminal.


- At the bottom of the screen click the middle symbol (the house).
- From the TWRP main menu (the 8 gray buttons), click on Advanced.
- Click File Manager.
- Go to the /system folder and select the build.prop file.
- Click the "chmod 755" button.
- Click on the 3 arrows button next to Swipe to Confirm.
- Click Reboot System.
- All of this step will need to be repeated every time your flash a ROM.


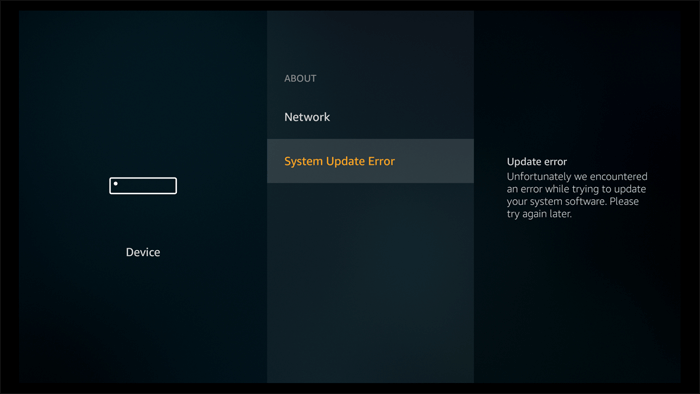
If you are updating from 5.0.5 firmware like I was, you might notice a bit of an upgrade in the Fire TV user interface. Once the Fire TV booted up I went to Settings, Device, About and selected Check for System Update. It spent a long time checking...

...and then it said System Update Error. Good. It appears update checking is deactivated. Note that on subsequent tests it did check for an update. I don't believe this to be a reliable method for blocking updates. At least not on its own.

Section 2 - Enable the ADB connection and set up communication to the Fire TV. Block software updates (Method 2).
Step 1
From the Fire TV's new home screen, scroll right to Settings. Arrow down and right to get to Device and select it. Scroll down the list to Developer options and select it. Ensure ADB debugging is on.
Press the back arrow button on the remote. In the Developer options menu, scroll up to About and select it. Scroll down to network and verify your IP address. Mine is 10.0.1.23.

Step 2
I am going to use a program called adbLink (formerly adbFire, seriously Amazon invented Fire?) which is a great and free tool. If you like it you may want to consider donating to the developer.Download adbLink here. They offer versions for Linux, Mac and Windows.

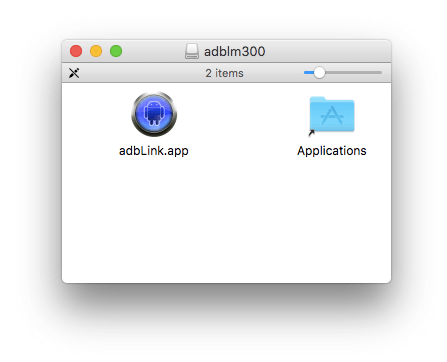
Double click the download and drag the application to your Applications folder.
Launch the application. Click the New button.

Give your device a name, and enter the IP address. Click Save when you're done.

With your device selected in the drop down box, click Connect. Your device name will appear under connected devices. Under Connection status it should say IP connection. Whenever you reboot you will need to reestablish a connection by disconnecting and reconnecting.

Now that there is a connection, we're going to use the second method of disabling the ability of the Fire TV to receive a software update from Amazon.
Click the ADB Shell button.

A Terminal window will open.

Enter
and then press Enter.su

In the Terminal you should now see the prompt root@sloane:/ #

Enter
and press the Enter key. You will receive a reply that OTA updates are now disabled.pm disable com.amazon.device.software.ota

If you didn't perform the first method, you can verify updates are disabled by going to Settings, Device, About, Check for System Update, and you’ll receive an error message. I have never seen this method allow for an update check.