
How to Root the Fire TV without a Computer using KingRoot, Install TWRP Custom Recovery, a Pre-Rooted ROM & Block Software Updates (Best Method).
Page 2 of 3Click on the KingRoot file.

Click Install.

Click INSTALL.

Click OPEN.

The program will first check your root status. If you aren't already rooted it will say that root access is unavailable. Click the TRY TO ROOT button. It will take a minute or less to root. If you get hung up at Verify Root Status and can't get past this good luck! You could get out of that jam by using the USB A to A cable method of rooting.

I performed this process a couple times. One time I got to about 20% my Fire TV rebooted. KingRoot continued working when it restarted and the counter went from 20% to a 100% in a second or so. Another time it didn't reboot. It just completed normally showing the screen with the Purify button.

When the program has finished you'll see this screen. Do NOT click the PURIFY button. Use the Back button to exit.

Now go to the Fire TV Home screen and launch the Kinguser app from the Apps menu.

As soon as it opens you can click OK at this pop up message and then use the Back button to exit out of the program.

Scroll over to the SManager app and launch it.

Click Ok.

Scroll down and click on the Download folder.

Scroll down to firetv2_recovery_v5.zip.

Press and hold the Select button until a pop up menu appears. Click the Open As... button.

Select Script/Executable from the menu.

Click the icon of the Android with bones above the letters Su. The button will light up. Then click the Run button above it.

Click Allow to grant root access.

TWRP custom recovery will be installed. You should see the following messages. Keep in mind it's okay if you see the message mount: Device or resource busy, as we'll be installing a ROM soon.

Click the Home button to exit.
At this point you'll want to connect your USB keyboard to the Fire TV.
Step 4.
On the Fire TV Home screen go to Settings, System, and click Restart.
My apologies because we've reached the point in the tutorial where the bad cell phone pictures are going to make their appearance. I've tried a couple methods using screenshot programs in recovery mode but can't make any of them work on Mac or Windows.
Here's the first screen you'll see when the Fire TV restarts. If you don't see this screen then restart the Fire TV again.

The next screen is the boot menu selector. Click the button on the right to Launch Recovery. You'll only have a couple seconds to do this. If you don't choose in time you'll will boot into the Fire TV OS instead. If you miss this just unplug the Fire TV and try it again.

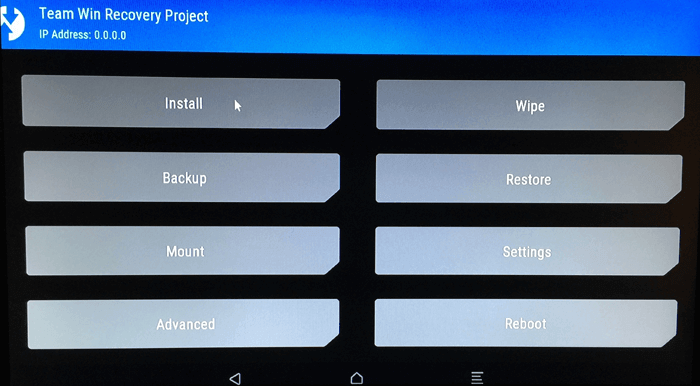
Once you are at this menu screen click the Install button.
We need to install the pre-rooted ROM that is on the SD card. I was already in the SD card when I came to this scren. Click the Download folder.

Click the sloane-5.0.5-rooted_r4.zip file.

Click the button with the three arrows on it right next to where it says Swipe to confirm Flash. The process will start immediately.

It matched the MD5 (if it had not matched then the flashing process would have halted) and began installing the ROM. This will only take a couple minutes.

Note that stock recovery has been disabled, and SuperSU has been installed. Once the install has completed click the Home button at the very bottom of the screen and in the middle. This will take you back to the home screen in TWRP.
